Follow Me On Social Media!


Pear Butter Recipe: Irresistibly Sweet for Cozy Mornings
Introduction to Pear Butter Recipe
Imagine a cozy autumn afternoon, the air filled with the sweet scent of ripe pears simmering on the stove, transforming into a velvety spread. That’s exactly what happens with this pear butter recipe—it captures the essence of fall, turning simple ingredients into something extraordinary. With its rich, caramel-like flavors and a hint of warm spices, pear butter is a delightful twist on traditional apple butter.
What makes pear butter so special? For starters, pears offer a uniquely delicate sweetness that complements the blend of spices perfectly. Unlike apple butter, which tends to be more familiar and often taken for granted, pear butter invites curiosity and appreciation for its distinctive flavor profile. The process of making it is just as rewarding: as the pears break down, they release their juices, creating a luscious consistency that spreads beautifully on toast, muffins, or pancakes.
Feeling inspired? You should be! This pear butter recipe is not just about enjoying a delicious topping; it’s also about creating memories. I still remember the first time I made it — my kitchen transformed into a haven of warmth and deliciousness, with my friends gathered around the counter, eager to taste the fruits of our labor. It’s a wonderful recipe to share during harvest season or as a thoughtful homemade gift.
What makes pear butter so special?
- Flavor Exploration: Pears are often overshadowed by other fruits, but they bring a gentle sweetness and subtle complexity that is hard to resist. This butter highlights their unique qualities while making your kitchen smell irresistible.
- Versatile Uses: Use it as a topping, a filling, or even a secret ingredient in baked treats. The depth of flavor it adds can surprise your guests!
- Homemade Warmth: Making pear butter is an invitation to slow down and enjoy the process. The hands-on experience of peeling, dicing, and stirring is therapeutic, making it a perfect weekend project.
Ready to dive in and create your own jar of pear goodness? Let’s gather those ingredients and start cooking!
Key Ingredients for Pear Butter Recipe
Ripe Pears: The star of our pear butter recipe is, of course, perfectly ripe pears. Their sweet and juicy flesh forms the base, giving the butter its smooth and luscious texture. Fresh pears are ideal, but if you’re in a pinch, canned pears work too—just make sure they are unsweetened for the best results.
Honey and Brown Sugar: For sweetness, I reach for honey, which not only sweetens but also adds a floral note. Pairing this with brown sugar introduces a depth of flavor that’s simply irresistible. Together, they create a harmonious blend that enhances the pear’s natural taste.
Lemon Juice: A splash of fresh lemon juice is key! It brightens the pear flavors and balances the sweetness beautifully, ensuring that every bite of your pear butter is both refreshing and delicious.
Spices: Ground cinnamon, ginger, nutmeg, and cloves contribute warmth and a touch of complexity. These spices turn the pear butter into a cozy treat that’s perfect for spreading on toast or adding to breakfast dishes.
Salt: Just a pinch of salt rounds out the sweet flavors, elevating the overall taste and making the butter even richer and more satisfying.
Why You’ll Love This Pear Butter Recipe
Creating a homemade pear butter recipe is not just about enjoying a delicious spread; it’s about savoring a warm, inviting atmosphere filled with nostalgia and comfort. Imagine a crisp autumn day, the sweet aroma of simmering pears wafting through your kitchen, wrapping you in a cozy hug. This pear butter will transport you back to those moments, evoking fond memories with every bite.
-
Simple Ingredients: Using just a few fresh and wholesome ingredients, this recipe celebrates the natural sweetness of pears. It’s an easy way to incorporate seasonal produce into your cooking, allowing you to enjoy the taste of fall year-round.
-
Versatility at Its Best: This pear butter isn’t just for spreading on toast. It’s a fantastic addition to oatmeal, yogurt, and even as a topping for pancakes and muffins. Plus, it can elevate savory dishes like pork and cheese platters, adding a unique twist to your culinary creations.
-
Gifting Delight: Sharing a jar of homemade pear butter makes for a thoughtful gift. Whether it’s for a housewarming, holiday, or simply to say “I’m thinking of you,” everyone appreciates a jar of something made with love.
Dive into this pear butter recipe and discover why it will become a cherished favorite in your kitchen!

Variations of Pear Butter Recipe
Embracing the art of making a pear butter recipe can lead you down delicious paths of creativity. While the classic approach is absolutely delightful, experimenting with variations can elevate your spread to a whole new level.
Spiced Pear Butter
For a cozy twist, you might consider incorporating spices like cinnamon, cloves, or nutmeg. Just a teaspoon of each can transform your pear butter recipe into a warm, aromatic treat perfect for fall mornings. Imagine spreading your creation atop warm toast while the comforting scents waft through the kitchen!
Vanilla Bean Pear Butter
If you’re a fan of vanilla, why not add a split vanilla bean to your mixture as it cooks? The tiny black flecks will not only enhance the visual appeal but also impart a rich, complex flavor.
Citrus Zest
A touch of lemon or orange zest can also brighten your pear butter. Just a teaspoon added towards the end of cooking will give your pear butter recipe a refreshing zing, balancing the sweetness of the pears perfectly.
Experimenting with these variations can help you find your favorite flavor profile, making each jar of pear butter uniquely your own. The possibilities are endless, so feel free to let your culinary creativity run wild!
Cooking Tips and Notes for Pear Butter Recipe
Creating the perfect pear butter recipe is a delightful journey, transforming humble pears into a spreadable treasure that bursts with autumn flavors. Whether you’re spreading it on toast or dolloping it on yogurt, a few thoughtful tips can elevate your pear butter to the next level.
Select the Right Pears
Building a great pear butter starts with the best fruit. Opt for ripe, flavorful pears like Bartlett or Bosc. They are juicy and sweet, making your butter rich and delicious. Overripe or bruised pears can lead to an undesirable texture, so be discerning when choosing your fruit.
Be Patient with Cooking
Slow cooking allows the natural sugars in the pears to caramelize, enhancing the flavor. Keep the heat low and avoid rushing the process. Stir occasionally to prevent sticking and ensure that each bit of pear becomes tender and flavorful.
Adjusting Consistency and Flavor
Once your mixture has simmered, you may want to adjust the spices or sweetness. If you’re after a thicker texture, simply cook it longer until it reaches your desired consistency. You can also experiment with spices like cinnamon or nutmeg to give your pear butter a unique twist—think about what flavors you love!
Storage Tips
Store your pear butter in sterilized jars and keep them in the refrigerator. For longer shelf life, consider canning it, following safe canning guidelines. When sealed properly, it can last for up to a year in cool, dark places.
Enjoy the delightful experience of making your own pear butter, and savor the delightful rewards all season long.

Serving Suggestions for Pear Butter Recipe
The simplicity and rich flavor of your pear butter recipe makes it incredibly versatile for various dish pairings. Think of it as your kitchen’s secret weapon when it comes to elevating meals and snacks alike.
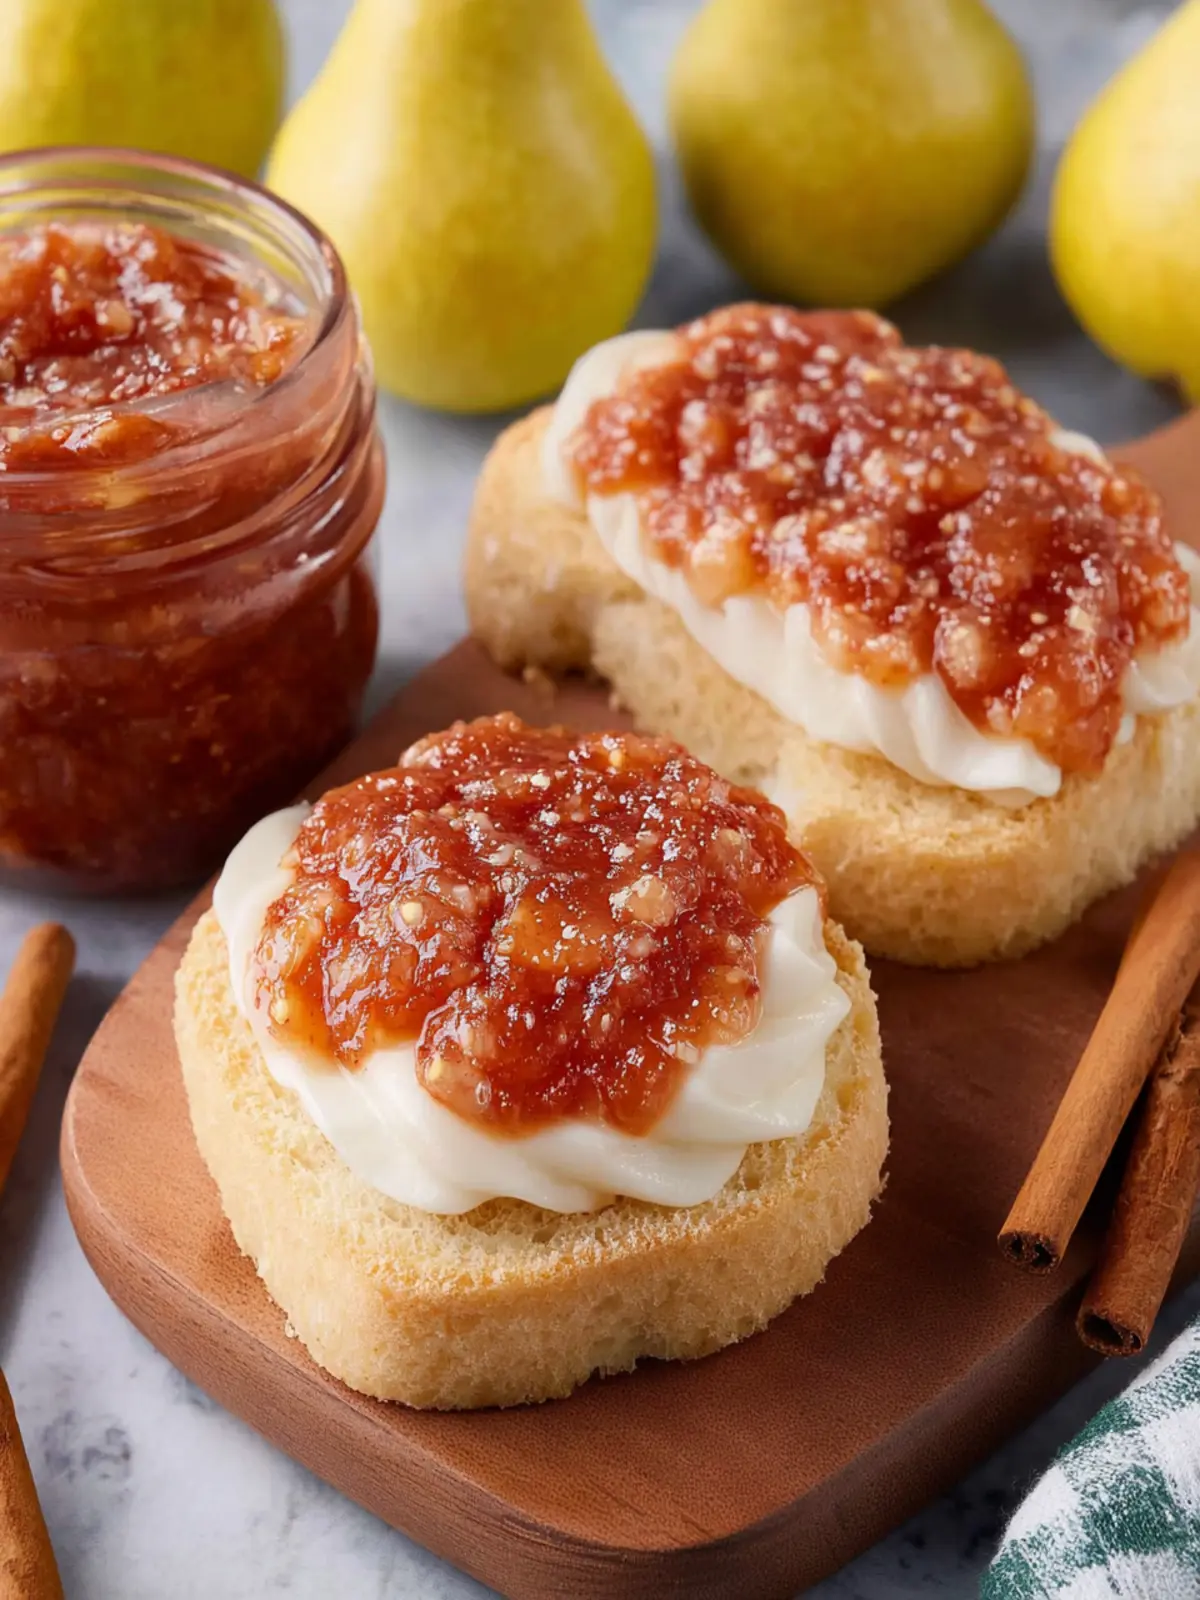
Spread it on Bread or Pastries
There’s nothing quite like the experience of spreading warm pear butter on freshly toasted bread. Whether it’s a crusty sourdough or fluffy brioche, the buttery richness melds beautifully with the fruitiness of the pears. Consider serving it on flaky pastries like croissants or Danish pastries for a delightful breakfast treat.
Pair with Cheese
For a sophisticated touch, combine your pear butter with a cheese platter. It beautifully complements creamy cheeses like brie or tangy blue cheese. The sweetness of the butter and the saltiness of the cheese create an irresistible flavor balance. Throw in some walnuts or almonds for crunch, and you have a simple yet elegant snack for your next gathering.
Accentuate Savory Dishes
Don’t shy away from using pear butter in savory dishes either. A dollop on roasted pork or chicken can add a delightful layer of flavor. The natural sweetness balances the savory elements of the meat wonderfully, transforming an everyday dish into something extraordinary.
Desserts Delight
Finally, think about desserts! A spoonful of pear butter can be a delightful topping for vanilla ice cream or yogurt, giving it a unique twist. It can also be swirled into oatmeal or pancakes for a deliciously fruity kick.
With these serving suggestions, your pear butter recipe will quickly become a cherished staple, enhancing both your culinary creations and your everyday snacks!
Time Breakdown for Pear Butter Recipe
Making homemade pear butter isn’t just a delightful endeavor—it’s a chance to infuse your kitchen with the sweet essence of ripe pears. Understanding the time commitment is key to enjoying the process, so here’s a clear breakdown:
Preparation Time
Setting aside about 15-20 minutes is perfect for peeling, coring, and chopping your pears. You’ll want everything ready to go before you start cooking!
Cooking Time
The cooking phase usually lasts around 1 to 1.5 hours. This slow simmer is crucial for enhancing the flavors and achieving that perfect, spreadable texture.
Cooling Time
Don’t forget to allow your pear butter to cool for about 30 minutes before storing it. This step helps thicken the butter even more and makes it easy to jar.
With this guide, you’ll be all set to whip up a delightful batch of pear butter that’s worth every minute!
Nutritional Facts for Pear Butter Recipe
Creating a delicious pear butter recipe doesn’t just nourish the soul; it also packs a nutritional punch. Understanding the nutritional content can help you savor every spreadable scoop.
Calories
In each serving of this delightful pear butter, you can expect about 70 calories. It’s a sweet and satisfying way to elevate your breakfast or snack without the guilt.
Sugar
The beauty of this pear butter lies in its natural sweetness, featuring around 12 grams of sugar per serving. Made from ripe pears, it brings a wholesome flavor without added sugars.
Fiber
Enjoying this pear butter provides a boost of dietary fiber, with around 2 grams per serving. That fiber aids digestion and contributes to your overall daily intake, making it a great choice for a healthy lifestyle.
Dive in and savor the rich flavors while reaping the benefits of this homemade delight!
FAQ about Pear Butter Recipe
Creating a delightful pear butter recipe evokes fond memories of autumn days spent in orchards, skillfully transforming ripe pears into a sweet, velvety spread. Here are some common questions and helpful insights to enhance your experience with making pear butter.
Can I use other types of fruit for this recipe?
Absolutely! While this pear butter recipe celebrates the sweetness of pears, you can easily substitute or combine them with other fruits like apples, peaches, or even quinces. Each fruit brings its unique flavor and texture, so feel free to experiment. Just keep in mind that cooking times may vary slightly based on the fruit’s water content and sweetness levels.
How long does homemade pear butter last in the fridge?
Once you’ve lovingly crafted your pear butter, it can last in the refrigerator for about 1 to 3 weeks when stored in an airtight container. Be sure to let it cool completely before sealing it up. If you consistently find yourself reaching for it every morning on toast or pancakes, you might finish it off even sooner!
Can I freeze pear butter?
Yes, indeed! Freezing pear butter is a fantastic way to extend its shelf life. When properly stored in freezer-safe containers or jars, it can last up to a year in the freezer. Just make sure to leave a bit of space at the top of your container for expansion. When you’re ready to enjoy it again, simply thaw it in the fridge overnight before slathering it on your favorite items.
Conclusion on Pear Butter Recipe
Crafting your own pear butter is not just a culinary endeavor; it’s a delightful journey that fills your kitchen with warmth and sweet aromas. With a blend of ripe pears, sugar, and a touch of spice, this pear butter recipe transforms simple ingredients into a luxurious spread perfect for toast, desserts, or even as a thoughtful gift. As you savor each velvety spoonful, think about how this delicious creation connects you to the seasons and the joy of homemade goodness. So grab those ripe pears and enjoy the process—you’ll be rewarded with a jar of happiness that lasts long after the canning jars are sealed.
Print
Spiced Pear Sauce
- Total Time: 1 hour 20 minutes
- Yield: 4 cups 1x
- Diet: gluten-free
Description
This spiced pear sauce is a delicious and easy recipe made with ripe pears and warm spices.
Ingredients
Scale
- 3 pounds ripe pears (remove stems, peels and slice)
- 3 tablespoons honey
- 1 tablespoon brown sugar
- 1/2 lemon (juiced)
- 1 teaspoon ground cinnamon
- 1/2 teaspoon ground ginger
- 1/4 teaspoon salt
- 1/4 teaspoon ground nutmeg
- 1/4 teaspoon ground cloves
Instructions
- Stir all the ingredients together in a medium saucepan.
- Bring the mixture to a boil over medium high heat.
- Cover, reduce the heat to low and simmer for 50-60 minutes, stirring occasionally.
- Remove the lid, increase the heat to medium and heat for 10-15 minutes until the liquid in the pan is reduced in half.
- Once the mixture has reduced and thickened, transfer to a food processor or blender or use an immersion blender in the pan to blend until smooth.
- Transfer to a canning jar or an air tight, heat proof, container and refrigerate until ready to use.
Notes
- For a smoother texture, blend the mixture longer.
- This sauce can be used as a topping for desserts or served with meats.
- Prep Time: 20 minutes
- Cook Time: 1 hour
- Category: Dessert
- Method: stovetop
- Cuisine: American
Nutrition
- Serving Size: 1/2 cup
- Calories: 120
- Sugar: 20g
- Sodium: 1mg
- Fat: 0g
- Saturated Fat: 0g
- Unsaturated Fat: 0g
- Trans Fat: 0g
- Carbohydrates: 31g
- Fiber: 3g
- Protein: 0g
- Cholesterol: 0mg